
Category Archives: Home & Garden

25 Ways To Personalize Your Family Home

Moving into a new home, or even just wanting to spruce up your current residence, can be a challenge. It takes time to make a house into a home, adding those essentials family touches help to transform it from a dull space into one with soul.

There are many different things you can do to personalise your home and make it your own, from adding a new coat of paint to hanging your family pictures on the walls. You can be as creative as you like and it doesn’t need to cost a small fortune. Here are 25 ideas you can use to add your personal touch to your home.

1. Paint The Front Door

The first thing anyone will see as they approach your home is the front door. It might not seem like the first place you would want to change, but painting your front door immediately adds character to your home. It gives any visitors a small insight into who lives inside.

2. Hanging Baskets

Once your door is looking brand new and shiny, you can decorate your entrance further by adding some plants. If you have the space either side of your front door, placing hanging baskets full of beautiful flowers is the best way to make your home feel inviting and well-looked after.

3. The Front Garden

If you only have a driveway, there’s no need to worry about this. If you take pride in what you home looks like to the outside world, tending to your front garden is an excellent way to make your home feel tidy and bright. Adding hardy plants such as Rhododendrons or Buddleia will make your garden spring to life without having to worry too much about the upkeep.

4. The Back Garden

There isn’t much which is more relaxing than coming home on a summer’s evening and sitting in the garden with your family enjoying a glass of wine. Having an inviting and open garden, no matter how small, is a great way to utilize extra space around your home. You can even include a swing set and trampoline for the kids!

5. Paint The Walls

If you are short on cash and want an easy way to add your own flair to a room: paint the walls. You can mix your own paint color or choose one from the store, either way; you’ll be adding your personality to the room.

6. Add Soft Furnishings

Throws and cushions are the easiest way to feel like an interior designer, adding new dimensions to your home. Picking up some boldly patterned cushions and placing them over a pastel sofa instantly creates an element of style in your living space.

7. Grab A Bargain

Gumtree is the perfect place to find local people who have secondhand furniture they want to sell. You could score a real bargain on a new table or chairs, and even have them delivered to your home. It’s a much cheaper way to spruce up your home than visiting traditional  retailers.

8. Seasonal Touches

Aside from the obvious festive decorations, you could also make your home more seasonal by adding some simple touches. Christmas bedding sets will transform your room into a winter wonderland, cute festive cushions and a new tartan throw will add that element of winter to your home.

9. Lighting

Spotlights, LED lights and fairy lights are excellent additions to your home, making it feel cozier and adding ambience to your home effortlessly.

10. Make It Cozy

On cold winter nights, the most satisfying feeling is to snuggle up on the sofa with your family. You can take this a step further by lighting scented candles around the house, turning on some soft fairy lights and cuddling up under a thick throw.

11. Buy New Mugs

A cute way to put your stamp on the kitchen, is to buy new mugs for you and your family. Let your children each choose their favourite mug, and store them on a shelf in the kitchen. You and your family will automatically have a cute personal item to use every day.

12. Replace Your Faucets

Old, rusty faucets can make even the most beautiful room look dull. You can buy really beautiful chrome or brushed nickel faucets online and instantly make your kitchen and bathroom feel clean and new.

13. A New Mattress

New mattresses will help you sleep, relax your muscles and allow you to wake up in the morning feeling ready to tackle the day ahead. No matter what your budget, you will be able to find the right mattress for you and your family. There are details at mattress-guides.net for how to choose the right one for you.

14. Chalkboard Paint

To stop your children from drawing all over the walls, why not try painting some chalkboard paint on the inside of your cupboard doors? Give your kids some chalk, and they can doodle all they like without it being on display, and without it becoming a permanent feature in your house.

15. Wall Art

If you want to vamp up a blank wall, the easiest thing to do is hang some art. You could hang up your children’s drawings, a pretty watercolour or even an inspiring quote. Whatever you choose, it will liven up the space and give it some life.

16. Family Photos

The ultimate way to put your stamp on the home is the hang personal photographs. You could opt for a professionally taken family portrait, or a collage of candid shots from your family vacation.

17. Add Some Houseplants

Do you ever feel like there’s  a small space which needs to be filled in your home? Well, the perfect solution is to add a few plants. Plants not only add colour and vibrancy to your home but also produce oxygen and are proven to relieve stress.

18. Install An Herb Garden

If you love to cook, then adding a herb garden to your home is an excellent idea. You will have constant access to fresh flavours and never have to repurchase a dried sachet.

19. Make The Most Of Natural Light

Natural light is the most fundamental tool in decorating your home. It can make the smallest space seem huge and adds a beautiful ray of light to every nook and cranny in your home. Open up the windows by ditching the large curtains and opting for blinds instead. You’ll gain space and light instantly.

20. Keep It Simple

Although you may be tempted to go all out and make everything in your home a feature, try and refrain from doing too much. It can be confusing to the eye and doesn’t look as put together as a simple design. All you need is 2-3 colours for a room, one bold, one pastel, and black or white. If you stick to this rule you will see a huge difference in the overall feel of your living space.

21. Disguise Old Furniture

If you would rather avoid having to invest in a brand new sofa, you can disguise it instead. Adding soft furnishings such as cushions and throws will immediately give a dull piece of furniture a new lease of life. Find some great ideas on revamping old furniture, HERE.

22. Get The Kids Involved

If you have children, let them have some input on your decisions. You could let them design their own bedrooms, pick out paints, wallpaper and soft furnishings to make them feel part of the process. Although children might have some crazy ideas, it might be fun to let them have free rein on their own space in the house. It could mean that you end up with a Disney princess palace in your home, but to see the look on your child’s face when it’s ready; it’s all worth the effort.

23. Match Your Appliances

When you decorate the kitchen, you will usually get new cabinets, countertops, backsplash and new tile for the floor. Once you’ve implemented all of these changes, why not finish it all off by matching your small appliances to the theme of the room? Buying a kettle and toaster to match the decor of your kitchen is a simple and effective way to tie the room together.

24. Add Accent Walls

Accent walls can be a great design feature. Painting one wall a bold color, or hanging some wallpaper on one wall of a room can bring it to life and draw the eye to that area, making the room feel and look a little bigger than it really is.

25. A Book Nook

If you or your children love to read, why not transform a small corner of the room into a cute little reading nook? Add lots of cushions, a beanbag and storage for your favourite novels, and you’ve instantly created a personalized space for you and your family to enjoy quiet time.

This is a sponsored guest post that may or may not represent the views or ideals of Mommy Ramblings.

2 Comments

Filed under Home, Home & Garden, sponsored guest post

Getting Final Remodeling Projects In Before Winter Comes

Autumn Is Here!

What’s that you smell in the air, is it a pumpkin-spiced latte? What’s that you feel in your soul as you drop your kids off at school—is it, could it be…pure joy? Well, not pure. You’ll miss them, of course—but what a relief! From eight to three (or 2:30 if you’re not so lucky), your kids are taken care of, they learn, and you get time to do what you need to.

One of those things could be some post-summer remodeling. Autumn and winter can be ideal times to upgrade your home, especially if you live in the south.  It’s not as hot outside, making yard work especially appealing.

Additionally, it’s a traditional “off-season”, so you may find decreased rates available. With school in session,  the kids won’t be tearing around the yard, getting in the way of contractors.

If you don’t live in the south, autumn still is an ideal time to remodel because winter is coming, and as they’re fond of saying in the adults-only HBO show Game of Thrones, “Winter is coming!”. It’ll get cold soon, and if you don’t take care of things like roof repairs, you could end up with much bigger structural problems. 

Some Outdoor Work

You want to get your roofing done before the winter hits. Since it’s already autumn, if you have not started, you might want to check out sites like South Jersey Roofers since they offer high-quality workmanship, a commitment to customer satisfaction, and proven reliability.

If you wait too long and live in a northern state, you may not be able to find any roofers to repair your issues. If that happens, you might have to use an emergency solution to get by until the weather warms up.  

Fall is a great time for last-minute structural remodeling. Additionally, you may not appreciate the features of some remodeling projects until late spring. Pergolas are one of those projects that come to mind.

If you’ve never heard of a pergola, this term refers to an adjustable awning which can be positioned with the touch of a button. It can keep out the snow, wind, and rain, or it can let in the sunshine. Whatever your preference, with the press of a button, you can change the way you enjoy your deck.

When it comes to outdoor pergola builders, you’ll be able to find top-tier solutions that will fit your needs; whether it be opening it up with the touch of a remote, angling it to provide the right amount of shade, or closing it completely.

Additional Considerations

You can actually use a pergola during winter as well.  Even in the coldest climates, there will be mild days, and you may want to read a book on the back deck in the sun. Soak up that winter sun while you can, if the clouds come in and you can feel the snow, just close the pergola slats, grab a blanket and keep reading.

Fall can also be the perfect time to install a security system. Again, it’s not nearly so hot outside as during the summer, and you want to have that system in place by the winter. There seems to be an increase in crime during the winter in southern states. This may not be the case if you live in the north, it will depend on your region. 

All in all, fall is the opportune time to tackle home improvement projects and make property upgrades like additions and completing essential home maintenance to prepare for the coming winter.

This is a sponsored post that does not necessary express the views or ideals of Mommy Ramblings.


Leave a Comment

Filed under Guest Post, Home & Garden, Home Improvement

3 Ways to Spot a Damaged Roof

This time of year can throw all kinds of weather at us; rain, wind, hailstones and more. So, whether you want to keep your home as safe as possible or your viewing new properties in the hopes of moving, it’s important to know how to spot damage. One of the most overlooked places on a house is the roof. Yet, if the roof has damage it can cause all kinds of problems inside the house. So, what do you need to look out for?

Check Your Shingles

One of the easiest tips, recommended by Elevated Roofing, is to check the roof for ripped shingles. After a storm, a few ripped shingles are often the easiest things to spot, just by looking at your roof from the ground floor. They may not look like they’ll cause a lot of hassle is left as they are, but it’s important to get them repaired as soon as possible, especially during the wetter months. One of the biggest problems to result from loose or damaged shingles is a leak in the house. You may not even notice it until it’s too late.

Hailstone Dents

It can be difficult to spot hailstone dents, but if you’ve recently had a bout of hailstones that you think could have caused damage, it’s worth checking. If you can spot dents on the roof, take a look at the angles of the roof, where the roof meets the wall. You’ll often be able to see dents in guttering too. If they’re present there, they’re likely to be present on the roof. If your roof slants, don’t attempt to climb it and check it yourself. Call a trustworthy professional who can give you a quote for any damage at the same time.

Inspect Your Attic

If you can’t see any visible damage by looking at your roof from the outside, it’s a good idea to get up into your attic and check for any leaks. If you spot a leak, it will easier to pinpoint where on the roof the damage is coming from and it’s often easier to contain and resolve the damp once found in the attic. If you don’t check or ignore the leaks found in the attic, it’s inevitable the leak will eventually spread throughout the rest of the house. Leaks will often present themselves as stains on the wall, rather than actual water puddles.

If you do find a leak in the attic but you have trouble pinpointing it, here’s a quick tip: Ask someone to help you and take a garden hose up onto the roof. Isolate small areas near to where the attic leak is. Let the hose run for several minutes in each area and have your helper in the attic looking out for leak. After a few minutes, the drip should appear in the attic. It can be time-consuming, but it will help you to narrow down where the damage is and find out how it needs to be fixed.

This is a sponsored guest post and does not necessarily represent the views of Mommy Ramblings.

1 Comment

Filed under Home & Garden, sponsored guest post

I Think I Found My Backsplash…Well, Maybe, Please Help Me!

I think I am going batty trying to pick out backsplash tile for my new kitchen. I am closer than ever to making a decision. I am however, a bit confused on some of the components. I had given up on trying to find a cream subway tile. Every time I found something there was no coordinating trim to do what I wanted. I brought home a piece of beveled white subway tile and it didn’t look too bad with my countertops.

You can imagine my surprise when, after giving up on finding cream, and picking everything in white, I found out I could get it all in a royal cream color. Shopping for tile is very confusing. So, now I am going with cream. I mean, I think I am going with the cream, lol.

I like a 3″ by 6″ subway tile that is beveled, and glossy.

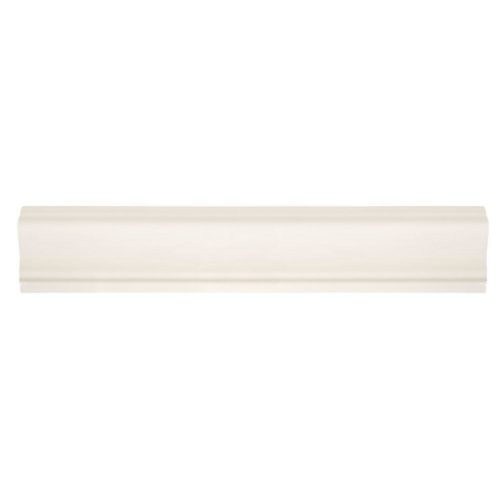
I don’t need much bullnose or trim pieces in my kitchen. I only need two small pieces where the tile comes up on the sides of the sink on either side of the window. I plan to top it with this piece of crown trim.

Gloss Cream Crown Molding 2.25″ by 12″

The other area I need a trim piece is on the side near my french sliding doors. I am not sure which trim piece to go with there, but there are a variety of trim pieces available. I will check with the installers, on what they think would look best. Here are some of the choices beyond the piece above. I know the colors don’t all look the same, but that is not accurate, they are all the same brand and same color.

Bead Wall Tile Trim 1″ by 6″


Bullnose 2″ by 6″


Bullnose Long Side Trim Tile 3″ by 6″

Bullnose Short Side Trim  3″ by 6″

1/2″ by 6″ Tile Trim

Dome Trim 12″ by 3/4″

Okay, at least there is an abundance of trim, the only thing they do not have, is the double bullnose corner piece. It is however available if I go with the white. I am not sure that it is necessary, but if it is, that will be my sign to go with the white, lol.

So now for the special accent behind the cooktop. I was inspired by this photo I found online on Pinterest or Google Images, I cannot even remember, I have looked at so many.

So, this brand also has a 4.5″ by 4.5″ tile that I could use in this design.

4.5″ by 4.5″ Square Tile

I would use the crown trim for the frame.

Crown Molding in Royal Cream 12 in. x 2-1/4 in.


The part I am stuck on is what color to use for the mosaics for the border and for the deco between the square tiles. Some that I think would be good are:


Natural Seashell Mosaic


Honey Polished Onyx Mosaic

White Natural Seashell Mosaic ( I think this may be too light to be an accent.)


Mini Tundra Glass and Stone Mosaic

My countertops are Cambria Quartz in Nevern.

My cabinets are Wood Mode in Vintage Bright White.

Ugh, as I am writing this, I am not thinking maybe I should go with the white. The cream is not a beige but really a bone that my kitchen designer said would look good. I am so conflicted. lol Here is the white:

White Beveled 3″ by 6″ Subway Tile

And a close up of it:

Close Up of White Subway Tile

And now the Royal Cream close up:

Royal Cream Close Up

My cabinets are not a bright white they have a glaze that makes them vintage, and more of a creamy white.

So, what are your thoughts on this? I really would love to hear, this has been the hardest decision of the entire kitchen project.


Leave a Comment

Filed under Home & Garden, Home Improvement

Easy Plum-The Amazing Store You Need To Know About

There are so many stores to choose from when shopping for appliances, furniture, electronics, computers, tools, toys and jewelry. The problem is, when you are looking to purchase big-ticket items, you might need credit. If you have just graduated, gone through a divorce, declared bankruptcy, started a new job or moved to a new apartment, your credit may not be established or your credit rating may be held against you. If this is you, maybe you feel like you are in a rock in hard place.

I have good news, Easy Plum is a store that can offer you easy and fast credit approval. They have a great selection of brand name products you know and trust. Easy Plum makes it easy to shop for the latest products with financing option to make them affordable for you and your family. Now, you can get the things you need, with payment terms you can handle. They also have fast, hassle free shipping, so what are you waiting for? Start shopping now at Easy Plum.

 Is this the first time you have heard of Easy Plum? I would love to know.

Leave a Comment

Filed under Home & Garden, jewelry, Resources, Shopping

KOR+ Turns Your Tap Water Into Hydrogen Rich, Antioxidant Water – #Giveaway

We all should know the importance of staying hydrated and drinking enough water every day. How would you like to go above and beyond that, by drinking a hydrogen-rich, pH balanced, antioxidant water? You may think, I mean some store bought  hydration drink, but I am talking about your own tap water.
Would you like to be able to turn your own tap water into extraordinary, hydrogen-rich antioxidant water? You can with the KOR+ water bottle. The capsule inside works to infuse your water with antioxidants that reduce oxidative stress, support your body’s natural antioxidant defense system and help to fight free radicals. With KOR+ super-charging your water, you will feel great and stay hydrated.
Check out this video below for more information:
Be one of the first to pre-order, and get up to ​40% off on KOR+! Early bird discounts will be extremely limited and will not last long. Make sure you get there early for a great discount.

Giveaway:

Now we have some more great news. If you would like to win a KOR+ Bottle and 3 Filters, enter the giveaway below (Winner will get a code that will be good in November to redeem for this new bottle and filters).

KOR  is sponsoring a giveaway on Mommy Ramblings. One lucky blog reader will win a new KOR + Water Bottle and 3 Filters (winner will receive a code that can be redeemed on the KOR website in November when the bottle goes on sale). Thank you KOR for the review bottle and for sponsoring this amazing giveaway on Mommy Ramblings!!! Open to US Residents in the contiguous 48 states.
KOR+ Bottle & 3 Filters Giveaway on Mommy Ramblings Rules:
Enter below using the Rafflecopter Widget. Good Luck!!!

Continue reading →


1 Comment

Filed under Giveaway, Home & Garden, Review

Part 2 of our Kitchen Transformation

If you have not seen Part 1 of our Kitchen Transformation click HERE.  You can also see our video constructions updates for a more in-depth, up close and personal look at everything, including the lessons we learned along the way.

So, the was the first piece of quartz installed. Sorry for the poor lighting, they still had not installed all the lights at this point. Also, outside the kitchen window is a temporary storage shed that will be moved, once we can move our stuff back in.

There will be a false drawer front that matches the cabinets surrounding the farmhouse sink. It is still being made in the factory, but we will show you what a difference it makes when installed. Again, the shed in the back is just temporary.

That is my plumber checking out the island top. I noticed after they left it was not even so they had to come back and redo that and the sink. Fun times.

The opening for the cooktop is cut on site. They bring in a fan that sucks out the dust and through an attached large tunnel tube it is blown outside. They also have a vacuum running.

Once the sinks had set, the faucets were installed along with the dishwasher and cooktop. We also installed the 3 pendant lights over the island and the one over the sink.  Then, the rest of the cabinets could be installed.

We need to get the crown molding installed on top of the cabinets and most of the interior cabinet lighting as well as the under cabinet and upper cabinet lighting. The cabinets still need to be aligned and the hardware installed. My biggest problem is, I cannot find a backsplash tile I like. Hope to do that this weekend. We have some more work to do but we have come a long way.


6 Comments

Filed under Curb Appeal, Home, Home & Garden, Home Improvement

Our Kitchen Transformation

So, if you don’t follow us on YouTube you might have missed all the construction updates on our house. If you would like to catch up, you can go to the Construction Update Playlist. In those videos, I share all the goofs, mishaps, mistakes and problems we encountered along the way. Here are some photos to show you where we started and how far we have come.

This was the kitchen before as is, it was a mess when I took these photos because we were in the middle of moving out.

This was during the demo of the kitchen, after the tile floor was removed.

The soffits were coming down, so they had to rip them out. We found a surprise under them.

That pipe near the window was our surprise. At first they thought it was a waste line from the upstairs bathroom that could not be moved, but they found out it was not, and we were able to move it!
Some new electric lines were installed and then they started putting the new insulation in. The recessed lighting also was moved.

Next, the sheet rock was put up and spackled.

Then they had to paint. They installed Hardibacker Board in preparation for the tile.

Next the tile floors needed to go in.

After the tile was in and grouted, our Wood-Mode Cabinets were delivered.

We protected our floors with a Red Rosin paper that is used as an underlayment for wood flooring

There were a lot of cabinets, moldings and trim delivered.

These were the first cabinets installed.

The new ovens were ready to be installed.


We had to wait to install the upper cabinets on the other side until the template was done for the quartz countertops because the cabinet in the corner sits on the countertop.

That is the end of this update, be sure to check out Part 2 of our Kitchen Transformation and Picking out our backsplash.  If you want to see more check out our YouTube Construction Update Videos.


1 Comment

Filed under Curb Appeal, Home & Garden, Home Improvement

Best Kitchen Renovation Tips Revealed by the Experts

This is a sponsored guest post that may or may not represent the views of Mommy Ramblings.

There are all kinds of renovations you can do in your home, but few have as much impact as a kitchen renovation. With that said there is a lot to consider when you are planning the renovation, going through the design process, and picking your materials. In order to ensure you don’t feel overwhelmed during the process, here’s a look at some of the best kitchen renovation tips from the experts themselves.

Make Sure the Design Stage Gets Enough Attention

While it’s easy to jump ahead and start envisioning what your perfect kitchen will look like, it’s important not to get too far ahead of yourself. Perhaps the most important step in the renovation process is actually the development of the design.

Ideally you want to hire a kitchen designer who will work with you through this stage. This is even more important if you plan on changing the configuration of your kitchen. You want to be sure the design is well thought out, flows, and makes sense. This is also the time you will be discussing the budget. Sure it would be great to design a kitchen without any concern for the costs, but that’s probably not reality. The designer should be made aware of your budget right from the start so it fits your needs.

As a side tip you may find it helpful to go through various design magazines that showcase kitchens before you meet with the designer. You want to be able to share your thoughts on the configuration, size, color scheme, materials, etc. Showing the designer pictures will help create an idea in their mind.

Picking Your Materials

For many homeowners the most exciting part about a kitchen renovation is getting to pick their materials. This is typically the area that also seems to have the most “opinions” involved. Designers can help you through this process as well, especially when it comes to sticking to the budget.

The designer and contractor can discuss what materials will work best for your needs and what will work with the design. Some of the items you’ll be picking include appliances, countertops, backsplash, cabinets, lighting, paint color, flooring, etc. If possible, it’s always handy to find a place that allows you to take samples home to try them in the space. It also gives you a chance to see how all the different materials work together.

Beautiful custom kitchens are built around materials and designs that not only look great, but also work well for that client’s needs.

Understanding the Timeline

The last process or step is to get an idea of the timeline. Obviously once you decide you want to go ahead with a renovation project you want to hurry up and get it done, but that isn’t usually possible. In general the typical timeline is anywhere from four to six months if you’re talking about a complete demolition job. Obviously this can be shorter or longer depending on the job, the materials chosen, and the construction crew.


10 Comments

Filed under Home & Garden, Home Improvement, sponsored guest post

4 Ways To Save on Home Maintenance

The following is a sponsored guest post that may or may not represent the views of Mommy Ramblings.

As a homeowner, it’s easy to shell out a nice chunk of money keeping your home in good condition. However, that doesn’t mean all your hard earned cash needs to go into home maintenance. Instead, you need to think about ways to save on home maintenance, and then actively work towards doing so. While everyone’s situation is slightly different, the following are a few simple ways you can save on home maintenance and put your money away for something you’ll enjoy.

Opt for DIY

When you want to save money, consider doing some maintenance on your own instead of hiring someone else to do it. There are plenty of small jobs around your house that you can easily do yourself, such as install a sink, replace a light fixture, or even update your front door. Before you get quotes on different jobs, be sure to look at the task at hand and see if it’s something you can spend a few hours tackling. By investing a little bit of time, you can end up saving a fortune.

Know when to hire a professional.

Although you can save money by doing things yourself, it’s also important you realize when you need to hire a professional. After all, putting certain jobs in the hands of trusted professionals can ensure the job gets done right the first time and can save you from spending more money trying to do it again. For instance, if you have an intricate plumbing problem, it’s smarter for you to hire a trusted plumber than to do the job yourself and do it wrong. If not, you’ll end up spending almost twice as much having someone come in to fix your mistakes.

Don’t put it off.

One of the biggest reasons home improvements are so expensive is because homeowners put them off until they’ve become too big to tackle. When this happens, the cost inevitably goes up. Make it a point to inspect your home thoroughly at least once a year, if not more. This way, you can make note of areas that need your attention before they get out of control. If you’re ever unsure, have a professional come in and do a home inspection every now and then. This can make you aware of underlying issues you may not have known existed, and it could save you a ton of money in the end.

Make smart decisions.

Unfortunately, there’s not a product out there that will look good and last forever, but there are products out there that are better than others. For instance, if you are building a home, opting for materials like brick or stone is a good choice. They will hold up better and stay looking newer longer, even when exposed to harsh weather conditions. By making the investment in stone or brick, you are helping your house stay in better condition with a product that doesn’t need as much maintenance. If you make smart decisions like this throughout your home, you can save money on home maintenance in the future.

Maintaining your home may not be the most enjoyable thing you have to do as a homeowner, but it is a necessity. If you make smart decisions and follow these tips, you can end up saving money on your home maintenance, which will make you happier in the long run as well.


6 Comments

Filed under Guest Post, Home & Garden, Home Improvement