Category Archives: DIY

Get Organized With These DIY Rain Gutter Bookshelves #Back2SchoolReady

This shop has been compensated by Collective Bias, Inc. and its advertiser. All opinions are mine alone. #Back2SchoolReady #CollectiveBiasback to school collage

We are a book loving family. My kids love getting new books even more than new toys! No bedtime routine is complete without us reading aloud together and it’s one of my favorite things. Sharing a great book with my children, the discussions they spur and that quality time we spend reading is priceless.

This time of year has people focusing on Back to School. Thinking about school supplies and clothes shopping as well as getting your pantry and freezer stocked with quick, nutritious breakfast, lunch and after-school snack foods. Kellogg’s has lots of products to choose from to help with that.

I was in Walmart recently and in their seasonal aisle it was stocked with  like Nutri-Grain breakfast bars, Pop-Tarts, Rice Krispies Treats and more.

kellogg's In Store Collage

Over in the frozen section there were so many boxes of delicious Eggo Waffles to choose from!  As I was making my selections, I saw something amazing on the boxes! Each specially marked box was redeemable for a free Scholastic Book!

Kelloggs Eggo In Store Collage

Great Kellogg’s product and free books made me a very happy camper.

Kelloggs in store cart

My kids love Eggo Waffles and they are easy to make even on busy school mornings.

Kelloggs 4


kellogs 4

Kelloggs

Nutri-Grain breakfast bars let you enjoy a nutritious and delicious breakfast on the go! They are a favorite choice  for this busy mom. My kids love them for breakfast, in their lunchbox and even as an after school snack.

Kelloggs 2

Kelloggs 3

Rice Krispies Treats are another favorite lunch box snack for my boys. Who can forget one of my favorites growing up, Pop-Tarts! They are still going strong and one my kids choose for a quick snack or after school treat. With Kellogg’s there is never a reason to skip breakfast! After all, it is the most important meal of the day!

Kelloggs 6

This Kellogg’s free Scholastic book promotion is truly the icing on the Kellogg’s cake! Every specially marked box has a code inside redeemable for a Scholastic Book of your choice. This free book promotion is great even if you don’t have little ones. Think about donating the books to less fortunate children and share the gift of reading. Donate them to a school, day care or nursery school in the area. For teachers this is a great way to get books for your classroom. I am so excited about this, can you tell?

It is so easy to redeem the codes for these free books. If you do not have one already you just set up a Kellogg’s Family Rewards Account HERE and then just put your code in and choose from a drop down list the store you purchased the product from. You can then enter more codes and when you’re done order your books.

Kelloggs 1

You can choose hard copy or eBooks with your codes. You can choose to donate a book to the school of your choice online. You can only donate hard copy books. When you donate a book to the school of your choice it will ship in an envelope that says it was generously donated by your family. All codes must be redeemed within 14 days of purchase. All books are shipped free of charge. Spanish titles are also available.

It is easy to choose your books and you can select by reading level. Have your child choose books that interest them. You can easily add all kinds of topics and reading level books to your home library. Having a good variety of books encourages kids to read.

We just redeemed 5 codes and ordered 2 Magic School Bus Books, A Clifford Book, 100 Most Feared Creatures and There was an Old Lady Who Swallowed A Book! We are excited to get them!

You can also buy direct at Walmart.com and receive free book purchases from purchases made between 7/21/15-9/11/15.  Look for Buy Now button HERE for a list of all eligible items. E-commerce redemptions are made via receipt scanning. See full details at the HERE link above.  Remember whether purchased in store or online you must redeem your code within 14 days to get your free book!

With all the great books we have and all the new free Scholastic books that are on their way to us, we needed some more book storage.  If you’re in the same boat, I want to share an easy, fast, inexpensive book storage solution that looks great too!

These book shelves that my husband and I recently put up in our son’s room are made from inexpensive vinyl rain gutters you can pick up in most home improvement stores.

gutter 11

They are very inexpensive, we purchased a 10′ rain gutter for under $4.  You need end caps and they are about $3 a piece and sold in sets of two. We used screws with anchors to attach them to the wall. For less than $10 each we had two 3′ book shelves and another 4′ book shelf we are putting by his bed. We love the results so much we are putting many more of these up.  In our music room we plan to put some up to hold all the music books.

I would advise you purchase the vinyl rain gutters over the aluminum for a number of reasons.  First and foremost they are safer, no sharp edges for kids or adults to get cut on, no shards of metal from drilling for screws or cutting. They will not get dented or bent the way aluminum gutters will. There is no crimping that needs to be done to attach the end caps as the vinyl end caps fit on easily and cleanly.

We cut the 10 foot gutter up into two 3 ft. pieces and one 4 ft. piece. There are lots of options with these gutters and you can even get connecting pieces to let them wrap a corner.

When we brought them home we just attached the end caps to each 3 foot section.


Gutter 3

Gutter 4

Gutter 5

Next, my husband easily drilled three holes for the screws. We put 1 screw on each end and one in the middle.  We used wall anchor screws and we added a washer that you fit under the lip of the gutter on the inside of the shelf and stops the screw from puckering the vinyl on the interior of the shelf.

Gutter 6

Then he put the shelf on the wall, leveled it and marked the screw holes. He then put the anchors in the wall. After that he just attached them to the wall with the screws and we were good to go.

Gutter 7

gutter 8

gutter 9

Gutter 10

gutter 12


Easy inexpensive book shelves made from vinyl rain gutters! #storage #books #diy #Back2SchoolReady #Ad #mommyramblings

A video posted by Mommy Ramblings (@mommyramblingsblog) on


These rain gutter shelves are super sturdy, hold lots of book and look great! Let me know what you think? What do you do for your book storage?


31 Comments

Filed under DIY, Family, Home & Garden, Main Page Post, Shoppertunity

How I Created A Nursery That’s A Jungle Of Fun-#MagicBabyMoments


This shop has been compensated by Collective Bias, Inc. and its advertiser. All opinions are mine alone.
#MagicBabyMoments #CollectiveBias

#MagicBabyMoments Collage

Living on a lake in a resort town, we do a lot of entertaining, especially in the summer. When you factor that we have 2 large homes on this lake, we get our share of company. Having five kids, we have loads of baby and kid gear,  so if someone forgets any baby gear or accessories, we have extras.  We decided it would be a good idea to help our guests out and make things as easy as possible when traveling with baby. We have a large home with many bedrooms so we thought about creating a nursery in one of the guest spaces.

The youngest 2 of our five kids were super close in age and both in cribs at the same time, so we had all the major pieces.  We decided to set up a crib and create a nursery space that will be a welcome relief to our visiting family with babies and toddlers.  We think it will be a huge relief to them  not having to stuff more oversized baby gear in their car or van when visiting.

I was in Walmart the other day and saw their Disney Baby bedding collection.  It was literally flying off the shelves it was so popular.  I spoke with an associate who told me that was why it seemed sparse.  I was lucky to find an adorable Disney Baby Lion King Jungle Fun, 3 Piece Bedding Set that would look great and was unisex. The set has accents of tan, aqua, ivory, green and brown that give me lots of decorating and painting options.

lion king in store aisle

I also picked up a coordinating super soft plush Disney Baby Lion King Jungle Fun Plush Blanket and Knit Beanie. The 3 piece crib set includes a dust ruffle, crib sheet and comforter.  Everything is affordably priced and perfect for a brand new nursery or as an easy way to update an existing one.

lion king collage in store

Heading home I could not wait to deck out the crib with the new bedding.  I was impressed with the quality of the set. For such a small price, I didn’t expect it to be so nice. What a pleasant surprise to unpack the items and find the great quality. The darling appliqued comforter is a large 42″ by 33″, the fabric is a 100% polyester microfiber that feels great. The three pieces are easy to care for and are machine washable and dryable. The comforter is so nice and has one cub with a velvety feel that little ones will just love.

lion king crib idea

Lion King Bedding

lion king bedding back

The coordinating Lion King plush blanket is super soft and comes with a knit beanie with cute playful ears in a golden shade of yellow great for boys or girls.  The blanket is 30″ by 40″ and is machine washable and dryable for easy care which I love.  It will be easy to freshen the bedding between our little guests.

Lion King blanket cap

Lion king crib

Lion King Dust Ruffle

Lion King blanket Sheet Crib Bedding Disney

Lion King Nursery 3

I am in the process of going through and adding all the Lion King accents we have like the Pumba and Timon.  I have all of the characters in plush, even figurines. I am going to add to a cute little shelf I just painted aqua and will hang on the wall.  I still have a lot I want to do like paint the walls a shade of green and bring the changing table in too! I am a perfectionist so I want everything perfect but decided to just get going and get the biggest piece in and work around that.  I will update when it’s all finished.

Lion King Nursery

.

Lion King Nursery 1

 I think the Disney Baby Lion King Jungle Fun 3 Piece Crib Bedding  Set and blanket with cap make an adorable theme for this new guest nursery.  What do you think?  Would love to hear your thoughts in the comments


8 Comments

Filed under Baby, Baby Gear, Disney, DIY, Family, Family Fun, Home, Home & Garden, Home Improvement, Shoppertunity

DIY Storage Made From 2 by 4’s To Hold Our Sadness & Anger-#InsideOutEmotions

This shop has been compensated by Collective Bias, Inc. and its advertiser. All opinions are mine alone. #InsideOutEmotions #CollectiveBias


diy storage bin from 2 by 4'sI think one of the biggest things we underestimate before we are parents, is the amount of “stuff” kids seem to need. From the nursery through childhood it seems that the “stuff” multiplies before our eyes. The gear, toys, clothing and more that seem to fill every corner of our home can sometimes seem overwhelming.

Finding a way to corral all the stuff seems to be a never-ending battle.  I find the hardest part is the balance between functional and aesthetically pleasing. Plastic bins and totes always look messy and like we are packing all the time.  They are good for putting things away in the basement or attic but not as long-term storage solutions.

Recently I was in Walmart and saw the display of plush characters from the new Disney Pixar movie Inside Out. If you are not aware of the movie, the characters represent the feelings and emotions we all carry inside. The 5 personified emotions in the movie are also plush characters called  Sadness, Anger, Joy, Fear and Disgust. I picked up Sadness and Anger and I have to admit it gave me more than a chuckle to say, “I went to Walmart and left with Sadness and Anger.”

disney pixar inside out  Collage


I think the characters are great and are a super springboard for kids to talk about their emotions with themselves, their parents, teachers or therapists. I frankly think they are even a good way for anyone to discuss their feelings. I was talking about it with some good friends and coworkers earlier today. We all thought if there should be a bin full of these plush emotions in every office.  Then everyone could take what they were feeling out and sit down at a conference table to discuss and hash out some tension.

The characters are huggable and soft but I could not help while holding sadness to think it could be said I had to let my sadness go. The same could be said of anger or fear. It was very humorous but  I think for children it is a very good way to discuss feelings and emotions in a constructive way.  I know my children enjoyed holding the plush characters and talking about the emotions and how they felt. Even very young children who cannot fully articulate or express their emotions would benefit engaging with the characters because it would be a very visual representation of their feelings.

Back to storage, now that 2 new plush characters have moved home with us, and I am sure the other 3 will soon  follow, I wanted to find a way to contain our emotions.  Sorry I could not resist that! I needed to find a storage solution that was good for all of my kid’s plush toys.

I found some plans on-line that looked really cool.  They were storage boxes made from 2 by 4s that were sturdy, had wheels and a handle.  The boxes would not be outgrown and literally could follow your child to college and beyond. I thought that the 2 by 4’s could be stained or painted and immediately got my husband involved.  s

We went out and bought ten 2 by 4’s, screws, pulls and casters.  We had wood glue and our tools so we headed home.  I stained the 2 by 4’s with a green water based stain. You will need to have a saw, drill, 4″ screws if you are not using a Kreg Jig and if you are you will need 2.5″ self tapping screws, wood filler, wood glue, 8 casters and 2 pulls. You will need to get six 10′ 2 by 4’s and two 8′ 2 by 4’s.

inside out Inside OUt 2 - Copy

Inside Out 3 - Copy

Inside OUt 4 - Copy

Inside Out 5 - Copy

Inside Out 6 - Copy

After the wood was stained and dry, it was time to make all the cuts we needed for the 2 boxes. We needed to cut the 2 by 4’s into the following lengths:

  • 8-16″ for legs
  • 12-14″ front/back
  • 12-18″ sides
  • 12-21″ bottom

Inside Out 7 - Copy

Inside Out 8 - Copy

Inside Out 10 - Copy

Inside OUt 11 - Copy

With all the pieces cut, we needed to assemble the boxes. You could use 4 inches screws to go through the 2 by 4’s or a Kreg Jig which makes it possible to screw through pocket holes.  The advantage of the Kreg Jig is that the screws are concealed and it creates the strongest joint. We chose to use the Kreg Jig to secure our boxes.

Inside Out Jig

Inside Out Jig 1

Inside out  jig 7 - Copy

Inside OUt Jig 2

Inside Out Jig 5

Inside out jig 4

INside OUt  8 - Copy


We used wood glue and screws to attach the pieces.

Inside OUt 18 - Copy

Inside Out 20 - Copy


Inside out 21 - Copy

Inside Out 22 - Copy

Inside Out 24 - Copy

Inside OUt 16 - Copy

Inside Out 23 - Copy

Inside Out 26


After all the sides are built and assembled you are ready to build the bottom.  Take the 6 pieces and glue and screw to secure.

Inside OUt 28

Inside OUt 27

Inside OUt 29


Attach the caster wheels. We are changing these wheels to something more heavy duty since the boxes can hold so much weight, we want stronger than a 50 lb limit on them. You never know what our son will put in these boxes in the future.

Inside out 30

Then I touched up all the stain.  I am going to put 2 coats of poly on but did not have the time yet.

Inside out 32

I will update when I have coated them with poly and when  we have the second box built and finished.  We are going to move them to the bottom of our son’s closet. He has a large closet with double doors and these 2 boxes are going on the bottom and will fit very nicely. We added the handle and then filled with some plush friends including Anger and Sadness.

Inside OUt 33

Inside Out Anger Sadness

Inside out 36

Inside OUt 35


So now we have a box to put our Anger and Sadness in and I know that soon we will be putting Joy, Fear and Disgust in too. Have you see Inside Out?  Let me know if you did and how you liked it.  If you decide to make these storage boxes let me know how they turn out, or if you have any questions. I hope you do, then you can contain your emotions too!


2 Comments

Filed under DIY, Home, Home Improvement

How We Made A Unique Coat Tree From Cut Timber For Free #BringingInnovation

This shop has been compensated by Collective Bias, Inc. and its advertiser. All opinions are mine alone. #BringingInnovation #CollectiveBias

green coat tree collage

I care deeply about the Earth, I love to repurpose things and use the natural resources around us.  It’s funny, even though our house has many closets, my children and husband leave their coats and back packs all over our kitchen chairs.  This drives me crazy! Since closets and wall racks did not work, I thought maybe a coat tree placed in the side hall would. The coat tree would be prominent,  they could easily hang their coats, hats and backpacks as they walked by.  I choose my battles and would rather have the coats on a coat tree in the side hall than on my kitchen chairs.

When I started researching coat trees, all I saw were flimsy or unattractive designs.  I looked further and found some really unique coat trees made out of TREES!  Can you imagine?  After seeing that and living on acres of wooded property…I think you can imagine my thoughts.  I called out to my husband  and showed him my idea, he was all for it. We couldn’t have picked a better time, many trees were recently cut by the town because they were too close to electric wires.  We gathered our tree supplies and started the process of assembly.

For the base my husband split a large log in half. Then he used a chainsaw and chisel to make a hole in the top of the base for the tree trunk.  He also hollowed out the underside of the log right beneath the hole on the top.  Hollowing the bottom made it possible to get the screw/bolt used to attach the trunk to the base, deeper into the trunk. We wanted to make sure the base was very safe and secure.

Tree Rack 9

Tree-Rack-

Tree Rack 8

Tree Rack 5


We also put wood glue around the base before attaching it.  Then my husband cut the “hooks” from long lengths of tree branches. After that he drilled holes in the tree trunk for them.  He put wood glue on the base of the branch hooks, then placed them in the holes and knocked them into place with a 2 pound sledge-hammer.  Right now, we have three branch hooks on the bottom for the little kids and three on the top for adults but we plan to add a few more.

Tree Rack 6

Tree Rack 7


As soon as this New York winter, err I mean spring, wants to give us some seasonable weather, we’re going to take the coat tree outside and seal and protect it with marine varnish.  I will update when it is finished with the final pictures.


Tree Rack 3

We are really impressed with our unique coat tree and have more projects in mind that we will share with you in the upcoming weeks.   We’re happy  we can utilize the natural resources on our property to make something we need.  In the end we have something we’re proud of and best of all is made in the USA by us!

The coat tree is super sturdy and far better than anything we could purchase. I wish we could make everything we need, but there are some things we can’t.  Batteries for our remotes, kid’s toys, clocks, and more are something we can’t harvest outside. Last weekend I was shopping at Walmart and saw new Energizer® EcoAdvanced AA Batteries and picked some up.  They’re right in the normal battery aisle in the photo department. EcoAdvanced AA batteries are the longest lasting and best performing Energizer® Alkaline ever!  Equally impressive EcoAdvanced AA and AAA batteries are the first in the world to be with a percentage of recycled batteries. You can stock up on them too, because they hold up to 12 years in storage.

walmart store image collage

Performance is very important to me, I work from home and rely on the battery in my computer mouse. If  I’m in the middle of a webinar or conference, I can’t afford to have the battery die when trying to change a slide (I hate touchpads). I need performance I can depend on. Energizer® EcoAdvanced Batteries give me peace of mind knowing I have that! This is another step  Energizer® is taking on their journey to bring performance and responsibility to the world – that’s positivenergy!™  I’m thrilled at these steps forward and love the guilt-free benefit I can count on in the longest lasting Energizer® alkaline!

Tree Rack 4

You know what else I love?  Coat free kitchen chairs around my table! Yippee for small but gratifying victories! Speaking of victories you can enter the “GuiltFreeEnergy” Giveaway below for your chance to win  $1,000 in Gift Cards!

GuiltFreeEnergy Giveaway – $1,000 in Gift Cards

I hope you will let me know what you think about our project and share with me what you’re doing to make our Earth a little greener!


1 Comment

Filed under DIY, Home, Shoppertunity

SteamMachine Plus Is The Answer For Chemical Free Spring Cleaning & We’re Giving One Away!

Anyone that knows me, knows I don’t use products with toxic chemicals. They also know I am a germophobe.  You may be wondering how I clean.  Well, I use a great line of cleaning products that are made with powerful plant based solvents and non-toxic ingredients but I also rely heavily on something else.  Steam, the power of STEAM!

HomeRight SteamMachine Collage


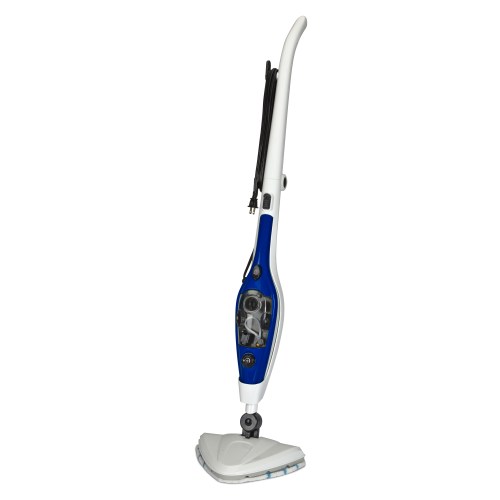
I love my full size HomeRight SteamMachine and so when I had the chance to try out the SteamMachine Plus from HomeRight, I was super excited.  It’s so perfect because it has a portable steam cleaner built right into the mop.  So you have everything you need to clean and sanitize your home in a very portable package.

C800949 SteamMachine Plus web_0

So let me tell you about this powerhouse of steam cleaning greatness.  This Steam Mop is my  go to for daily cleaning jobs of all kinds and lets me see sparkling results in less time.  The detachable hand-held steamer is what really sets this mop apart from other steam mops.  Literally at your fingertips you have everything you need to clean from floor to ceiling.  Homerite Steam Pro Mop Pic

HormRight Steam Pro Mop Portable Steamer

Homright-SteamMachine-Plus-Cleaner


Homeright-Steam-Machine-Plus


HomeRight-Portable-Steam-Cleaner

6 useful attachments are included and you can use the portable steamer to clean and disinfect stoves, ovens, grills, counters, bathroom surfaces and so much more.  The steam is 205 degrees as it leaves the nozzle and kills 99.9% of germs and bacteria including e-coli, salmonella and staph germs.

Homeright Steam Cleaner Attachments

C800949 Steam Mop wAccessories

The convenient fold down handle makes it easy to store the mop in the closet or pantry.  The mop comes with 2 pads that attach to the triangular-shaped, swivel mop head.  The shape of the mop head along with the swivel make it easy to get into even tight spaces.

Homrite Steam Mop

Homerite Steam Pro  Mop

HomeRight-Steam-Mop-Plus

The steam trigger on the handle lets you get extra steam on demand for tough jobs.  You can use the mop on tile, laminate, hardwood and vinyl flooring and the carpet glider allows you to steam clean rugs.

Homerite Steam Pro Mop Attachment

HomeRight-Steam-Machine, Attachment-Cleaning

Homeright-SteamMachine-Plus-Shower Door

Homerie Steam Cleaner


Homeright Steam Cleaning

This mop heats up fast, just 30 seconds and you are good to go and can clean about 20 minutes on one tank of water.  The 16 foot cord lets you have enough mobility to clean a good size area without having to find another outlet or use an extension cord.

C800949 Steam Mop Handle

Included in Box:

  • Detachable Steamer
  • Steamer Frame
  • Mop Head
  • Carpet Glider
  • (2) Microfiber Mop Pads
  • Squeegee/Fabric Steamer
  • Cotton Bonnet for Squeegee/Fabric Steamer
  • Small Nylon Brush
  • Large Nylon Brush
  • Angled Jet Nozzle
  • Grout Brush
  • Scraper
  • Straight Adaptor
  • Measuring Cup


Specifications:

  • 205 degree F steam
  • 20 Minute Run Time
  • Heats Up in 30 Seconds
  • 12 Ounce Water Tank
  • 1500 Watts
  • 120 Volts
  • 16 Foot Cord
  • UL Safety Listed
HomeRight is sponsoring a giveaway on Mommy Ramblings!  One lucky blog reader will win their own HomeRight SteamMachine Plus Mop!  Thank you to HomeRight for the review product and for sponsoring this steaming giveaway on Mommy Ramblings!!!  Open to US residents.

HomeRight SteamMachine Plus Mop Giveaway on Mommy Ramblings Rules:

Please enter the giveaway using the Rafflecopter widget below.  Good Luck!!!

Continue reading


32 Comments

Filed under DIY, Giveaway, Health, Home, Home Improvement, Kitchen, Main Page Post, Mommy Ramblings, Natural, Review

Join Us For Peter Walsh’s 31 Days 2 Get Organized 2015!!! #31Days2GetOrganized

I am so excited!  I love Peter Walsh! He is such an inspiration for releasing the “stuff” that holds us back.  The other day I saw that he was asking us to recruit someone for  ‪#‎31Days2GetOrganized‬  for 2015!  I recruited a good friend,  then I thought more about it.  Why don’t we all do this?  I think it will be a lot of fun if we all come together and let go of things we are hanging on to that are truly weighing us down.  What a wonderful way to make a slow month like January much more fun and productive!  So I am recruiting all of you!  Please join me in the 31 Days 2 Get Organized with Peter Walsh.

If you have never heard of Peter Walsh and I can’t imagine anyone that hasn’t, but if you are in the dark about who he is and what he does, just click the video below to get to know him.


I want to make things really exciting so I created a closed Facebook group just for this.  The closed group means that even your most cluttered closet is safe with us and there will be no judging or negativity.  The link for the group is here and you can join now.  In the group you will post your before and afters of the 31, ten minute challenges Peter will dole out each day.  We can work to encourage and keep everyone accountable.  I hope you will all join in this with me.

Peter has a New Year Message for us here:

Peter Walsh please join our Facebook Group so you can see our progress.  Are you ready for the challenge?  I sure am!  Comment here and let me know you are up to the challenge and recruit someone to come along.

If you are chomping at the bit to get started you can work on this until Monday January 5th! I know you were so excited to start tomorrow but Peter says it officially starts on January 5th! Don’t worry take his advice and get your family and friends on board and in the meantime join the group and get aquainted. If you just can’t wait, you can get a head start on the challenge with Peter Walsh: 15 Declutter Projects for a Saner You.  Of course follow Peter on Facebook and YouTube so you don’t miss a thing!


Leave a Comment

Filed under Curb Appeal, DIY, Home, Home Improvement, Kitchen, Life Stages, Main Page Post, Mommy Ramblings

How To Make An Adorable Applique Birthday Shirt!!! Easy and Quick Project!

I like to have birthday shirts for my kids and take a picture of them in it on their actual birthday.  A few years ago I made one but most of the time I buy them. However, after the success I had with the Christmas shirts, I decided to try and make an applique birthday shirt for my son.  It was so easy and looked great!  If you would like to try, you can follow the easy tutorial here.

DIY Birthday Shirt Collage

Supplies:

  • Plain Shirt- short or long sleeve
  • Material- small amount for number
  • Number Template- easy to find online
  • Scissors-Craft and Fabric
  • Thread to coordinate with number fabric and shirt
  • Sewable Heat Bond
  • Iron
  • Straight Pins
  • Sewing Machine with Applique Stitch or you can Zig Zag.

Prep:

Make sure to wash your fabric and shirt before starting and then iron.


1. Cut some fabric for your number

bday shirt 1

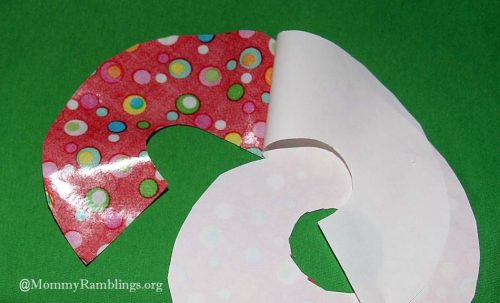
2. Cut a piece of sewable heat bond and iron it on the back side of the fabric.  **Remember when cutting the sewable heat bond or the fabric that has it ironed on, never use your fabric scissors!  You will ruin them.  Always use your craft scissors when cutting anything with heat bond.

bday shirt 2


bday shirt 3


3. Place the number template on the front side of the fabric, pin and cut.

bday shirt 4

4. Remove the heat bond paper backing from the number,  the nice shiny texture will allow you to iron the number on and hold it securely to sew.

bday shirt 6

bday shirt 7


bday shirt 5

5. Iron the number on the shirt.

bday shirt 8


6.Take the shirt over to your machine and use an applique stitch around the edges

bday shirt 10


7.Trim the loose threads and iron the shirt and you are finished.

bday shirt 11

Please share with me if you try this.  I would love to see and hear about your creations.


9 Comments

Filed under DIY, Giveaway

Glee Gum, Make Your Own Candy Kit, Review & Giveaway!!! #HolidayGiftGuide

In the past you may have read about how we made our own milk chocolate with kits from Glee Gum.  We decided to mix it up a bit this year and try a different kit.  We opted for the Make Your Own Chewing Gum Kit.  So recently we set out to test out our gum making skills.  The kit comes with all you need, even a disposable tray to melt the chicle gum base which resembles small beads or popcorn kernels.  The reason for the disposable tray is because the chicle gum base when melted is so incredibly sticky.


Chewing Gum Kit

Chewing Gum Kit 1

We used the microwave to melt the chicle gum base and when it was melted we added the corn syrup and tried to stir.

Chewing Gum Kit 2

Chewing Gum Kit 3

Chewing Gum Kit 4


I say tried to because the stickiness really makes you add some serious muscle to the mix.  after that you roll it in the confectioner’s sugar and then knead in one of the flavor packets.  After that you roll it and cut it into pieces.  The best part is last and you can taste your creation.

Chewing Gum Kit 5

Chweing Gum Kit 7


My kids thought it was fun and as a parent it was very educational like all their “make your own” kits.  For parents, educators and home school the website has a lesson plan with resources to expand on and more.  You can see more educational material HERE.  We have also added Glee Gum Make Your Own Candy Kits to our 2014 Holiday Gift Guide.

Glee Gum is sponsoring a giveaway on Mommy Ramblings and one lucky winner will win their choice of Make Your Own Candy Kit!  Thank you Glee Gum for the review kit and for sponsoring this sweet giveaway on Mommy Ramblings!!!  Open to US Residents.

Glee Gum, Make Your Own Candy Kit Giveaway on Mommy Ramblings Rules:

Please enter using the Rafflecopter widget below.  Good Luck!!!

Continue reading


8 Comments

Filed under Baking, Christmas, DIY, Family, Family Fun, Giveaway, Kitchen, Main Page Post, Mommy Ramblings, Recipes, Review

Epson LabelWorks LW-600P Label Printer Review & Giveaway!!! #HolidayGiftGuide

Epson Logo

Are you trying to get more organized?  Do you ever pack things up in boxes and totes and forget what’s inside?  Do you ever want to do something crafty like create professional looking monogrammed or personalized ribbons  for cards, wedding favors, hair bows and more?  If you answered yes to any or all of these things, I want to introduce you to the Epson LabelWorks LW-600P Label Printer.  

Epson-LW-600P-Label-Printer

This compact desktop label printer will let you create original labels that you can customize with clip art, your own photos and even your own handwriting or drawings.  You can also take a picture of what is in the boxes you are packing and create a bar code label to stick on the outside of the box.  If you scan the bar code label you will see a picture of what is inside the box!


Epson-LabelWorks-2

Epson-LabelWorks


Epson-Label-Works


Epson-Label-Works-1


Epson-Label-Works -4


Epson-Label-Works-4


Labels are not the only thing it prints.  How about printing on beautiful ribbons.  What a great way to make wedding and party favors, your own cards, custom ornament hanging ribbon, hair bows, and so much more.

Epson-Label-Works-2

Epson-Label-Works-6


Epson-Label-Works-7

Epson-Label-Works-8

Epson-Label-Works-9

It’s so simple to start printing with the bluetooth capability.  I was able to create and print from my laptop, iPad and iPhone in a flash.  Just download the app and I was ready to roll.  I cannot wait to use this to organize our home which is in the middle of at least 4 major home improvement projects at the same time.  I am so excited to start taking back some order and taming the chaos around here.  I will update with more of my own projects and organization examples very soon.  You can find the Epson LabelWorks LW-600P on Mommy Ramblings’ 2014 Holiday Gift Guide!

More about LabelWorks LW-600P:

Print labels smarter

Now, it’s easier than ever to print customized labels — virtually anywhere — with the LW-600P portable label printer. Print labels from your smartphone, tablet, PC or Mac. Print date labels for food items, QR code labels, or labels to organize cables. Create ribbons for gifts, or even labels with symbols or hand-written messages. Preview labels before printing. Or, use smartphones with voice recognition2 to create labels fast. Download the Epson iLabel app for iOS or Android devices or choose from other compatible apps3 available. With multiple tapes to choose from (up to one-inch wide) and an automatic cutter, you’ve got all you need for customized labels on the go.

Connect smarter

The battery-operated1 LW-600P can print wirelessly from iOS and Android devices, via Bluetooth. Simply download the Epson iLabel app or other compatible apps.3 Use your mobile device to create handwritten labels, iron-on labels, ribbons and more. This compact printer can also print from Windows® and Mac systems via a USB cable.

Enter The Giveaway:

Epson is sponsoring a giveaway on Mommy Ramblings. One lucky blog reader will win an Epson LW-600P Label Printer. Than you Epson for the review product and for sponsoring this fantastic giveaway on Mommy Ramblings!!!  Open to US residents.

Epson LabelWorks  LW-600P Label Printer Giveaway on Mommy Ramblings Rules:

Please enter to win using the Rafflecopter widget below.  Good Luck!!!

Continue reading


23 Comments

Filed under Christmas, DIY, Giveaway, Holiday, Kitchen, Main Page Post, Mommy Ramblings, Tech

Easy Appliqued Holiday Shirts You Can Make For Thanksgiving & Christmas!!!

You may remember my tales of woe from learning to sew in my post where I showed how I finished an antique vanity as a sewing table.  Aside from an owl pillow I made in 6th grade Home-ec, my attempts at sewing were nothing to write home about.  However, I’m not a quitter, so I was ready to give it another go when I wanted to create some cute whimsical holiday shirts for my kids and family.

I bought some long sleeve cotton shirts and then visited the craft department for some fabrics.  The first shirt I was going to try to make was a turkey for Thanksgiving.  I planned to make the turkey body in brown flannel fabric so I bought a yard of that since I also planned to use it for the Christmas shirts, then I picked several other fabrics for feathers.  I also purchased some polka dot fabric for the antlers and solid red, yellow, black and green for various accents.  Armed with my array of fabrics and some notions like colorful buttons and embroidery thread, I was ready.

I drew my turkey template free hand onto some card stock and cut it out.  I thought I would do feet too but did not end up putting feet on the design.

Turkey shirt 1

I washed the shirts and all the fabrics prior to sewing anything.  After I ironed the fabric I cut the pattern shapes and laid them out how I wanted, then when my design was the way I liked, I secured the fabric pieces with a sewable heat bond.  After that it was off to the sewing machine where I sewed around the pieces with an applique stitch.  The first shirts were a bit laughable but my little ones thought they were great and with every shirt I got better.

Turkey shirt 3

Turkey Shirt 4

Turkey Shirt 5

Turkey Shirt 2

Turkey Shirt


For the Christmas shirts I did the same thing except I made a moose template which honestly ended up looking more like a reindeer but nevertheless is still cute.  I was in a rush because we were using them for a picture but would like to add bows on my daughter’s shirt and mine as well.  For all the boys I want to add a bow tie.

This is the light hold heat bond that is sewable, I just wanted to hold it in place so I did not need to use pins for sewing.  It worked well.

This is the light hold heat bond that is sewable, I just wanted to hold it in place so I did not need to use pins for sewing. It worked well.


Moose Shirt 1

Moose Shirt 4

Moose Shrit 2


Moose Shirt 5

Moose Shirt 6

Christmas Shirts


Applique shirts_edited-1

I made 9 shirts in all (2 turkey shirts and 7 Christmas shirts). It really gave me confidence to make friends with my sewing machine and if I could do this, anyone can.  I know they are far from perfect but they are made with love and to me that is what matters the most.  If you would like any more specifics please ask.


4 Comments

Filed under Christmas, Crafts, DIY, Family Fun, Fashion, Holiday, Main Page Post, Mommy Ramblings, Toddler