Tag Archives: Tile

I Think I Found My Backsplash…Well, Maybe, Please Help Me!

I think I am going batty trying to pick out backsplash tile for my new kitchen. I am closer than ever to making a decision. I am however, a bit confused on some of the components. I had given up on trying to find a cream subway tile. Every time I found something there was no coordinating trim to do what I wanted. I brought home a piece of beveled white subway tile and it didn’t look too bad with my countertops.

You can imagine my surprise when, after giving up on finding cream, and picking everything in white, I found out I could get it all in a royal cream color. Shopping for tile is very confusing. So, now I am going with cream. I mean, I think I am going with the cream, lol.

I like a 3″ by 6″ subway tile that is beveled, and glossy.

I don’t need much bullnose or trim pieces in my kitchen. I only need two small pieces where the tile comes up on the sides of the sink on either side of the window. I plan to top it with this piece of crown trim.

Gloss Cream Crown Molding 2.25″ by 12″

The other area I need a trim piece is on the side near my french sliding doors. I am not sure which trim piece to go with there, but there are a variety of trim pieces available. I will check with the installers, on what they think would look best. Here are some of the choices beyond the piece above. I know the colors don’t all look the same, but that is not accurate, they are all the same brand and same color.

Bead Wall Tile Trim 1″ by 6″


Bullnose 2″ by 6″


Bullnose Long Side Trim Tile 3″ by 6″

Bullnose Short Side Trim  3″ by 6″

1/2″ by 6″ Tile Trim

Dome Trim 12″ by 3/4″

Okay, at least there is an abundance of trim, the only thing they do not have, is the double bullnose corner piece. It is however available if I go with the white. I am not sure that it is necessary, but if it is, that will be my sign to go with the white, lol.

So now for the special accent behind the cooktop. I was inspired by this photo I found online on Pinterest or Google Images, I cannot even remember, I have looked at so many.

So, this brand also has a 4.5″ by 4.5″ tile that I could use in this design.

4.5″ by 4.5″ Square Tile

I would use the crown trim for the frame.

Crown Molding in Royal Cream 12 in. x 2-1/4 in.


The part I am stuck on is what color to use for the mosaics for the border and for the deco between the square tiles. Some that I think would be good are:


Natural Seashell Mosaic


Honey Polished Onyx Mosaic

White Natural Seashell Mosaic ( I think this may be too light to be an accent.)


Mini Tundra Glass and Stone Mosaic

My countertops are Cambria Quartz in Nevern.

My cabinets are Wood Mode in Vintage Bright White.

Ugh, as I am writing this, I am not thinking maybe I should go with the white. The cream is not a beige but really a bone that my kitchen designer said would look good. I am so conflicted. lol Here is the white:

White Beveled 3″ by 6″ Subway Tile

And a close up of it:

Close Up of White Subway Tile

And now the Royal Cream close up:

Royal Cream Close Up

My cabinets are not a bright white they have a glaze that makes them vintage, and more of a creamy white.

So, what are your thoughts on this? I really would love to hear, this has been the hardest decision of the entire kitchen project.


Leave a Comment

Filed under Home & Garden, Home Improvement

Part 2 of our Kitchen Transformation

If you have not seen Part 1 of our Kitchen Transformation click HERE.  You can also see our video constructions updates for a more in-depth, up close and personal look at everything, including the lessons we learned along the way.

So, the was the first piece of quartz installed. Sorry for the poor lighting, they still had not installed all the lights at this point. Also, outside the kitchen window is a temporary storage shed that will be moved, once we can move our stuff back in.

There will be a false drawer front that matches the cabinets surrounding the farmhouse sink. It is still being made in the factory, but we will show you what a difference it makes when installed. Again, the shed in the back is just temporary.

That is my plumber checking out the island top. I noticed after they left it was not even so they had to come back and redo that and the sink. Fun times.

The opening for the cooktop is cut on site. They bring in a fan that sucks out the dust and through an attached large tunnel tube it is blown outside. They also have a vacuum running.

Once the sinks had set, the faucets were installed along with the dishwasher and cooktop. We also installed the 3 pendant lights over the island and the one over the sink.  Then, the rest of the cabinets could be installed.

We need to get the crown molding installed on top of the cabinets and most of the interior cabinet lighting as well as the under cabinet and upper cabinet lighting. The cabinets still need to be aligned and the hardware installed. My biggest problem is, I cannot find a backsplash tile I like. Hope to do that this weekend. We have some more work to do but we have come a long way.


6 Comments

Filed under Curb Appeal, Home, Home & Garden, Home Improvement

Our Kitchen Transformation

So, if you don’t follow us on YouTube you might have missed all the construction updates on our house. If you would like to catch up, you can go to the Construction Update Playlist. In those videos, I share all the goofs, mishaps, mistakes and problems we encountered along the way. Here are some photos to show you where we started and how far we have come.

This was the kitchen before as is, it was a mess when I took these photos because we were in the middle of moving out.

This was during the demo of the kitchen, after the tile floor was removed.

The soffits were coming down, so they had to rip them out. We found a surprise under them.

That pipe near the window was our surprise. At first they thought it was a waste line from the upstairs bathroom that could not be moved, but they found out it was not, and we were able to move it!

Some new electric lines were installed and then they started putting the new insulation in. The recessed lighting also was moved.

Next, the sheet rock was put up and spackled.

Then they had to paint. They installed Hardibacker Board in preparation for the tile.

Next the tile floors needed to go in.

After the tile was in and grouted, our Wood-Mode Cabinets were delivered.

We protected our floors with a Red Rosin paper that is used as an underlayment for wood flooring

There were a lot of cabinets, moldings and trim delivered.

These were the first cabinets installed.

The new ovens were ready to be installed.


We had to wait to install the upper cabinets on the other side until the template was done for the quartz countertops because the cabinet in the corner sits on the countertop.

That is the end of this update, be sure to check out Part 2 of our Kitchen Transformation and Picking out our backsplash.  If you want to see more check out our YouTube Construction Update Videos.


1 Comment

Filed under Curb Appeal, Home & Garden, Home Improvement

New Kitchen Update -Choosing Our Cabinets, Sinks, Countertop and More!

Happy New Year everyone! Hope everyone’s year is off to a great start. I have some updates on our new kitchen. While the demo and everything in the house is going to take another 8 weeks at least, we are making headway with our kitchen decisions.

I believe, I shared our choice of Wood-Mode Custom Cabinetry for our kitchen. We are going with their Brookhaven line and our door style is Winter Haven Raised.

The first time I went into the kitchen design center and started working with Regina, our kitchen designer, I was sure I was going with Antique White. Yesterday, when my husband and I were there together making final decisions, I changed my color choice. I am going with Vintage Lace.

Wood-Mode’s Vintage Opaque is a distinctive glaze applied over the base color which in our case is Lace and adds a brushed appearance to the surface while highlighting the details of the door style and architectural elements.

It is funny because the first time I was there, I was sure I did not want that look and yet, the second time, I was sold on it. I feel that is why it is so important to meet with your kitchen designer multiple times in the planning stages of your project. So far, we have been to the kitchen showroom 2 times and Regina has been out to our house once to take measurements.

Now, that we are getting closer to putting the order in, she will come out again to make sure everything is correct. It is so nice to work with a kitchen designer who has experience and guides you along through the process. Yesterday, I remember clearly  saying to myself, “Wow, I am so glad she thought of that!”

The other thing is, they can give you great advice that can save you money and headaches. For instance, since my cooktop is mounted against an outside wall, she advised me not to go with a pot filler. I was not sold on one either, you may remember my earlier post.

The reason is, living in upstate New York, there is a danger of the pipes freezing which would cause extensive damage to our kitchen. Dealing with the damage from a leak is something we are familiar with and do not wish to deal with again if we can help it.

I know you can mount them on deck but I don’t want that sticking out of the counter top. Truthfully, the more I read about them, the more I am glad to have that reason for not putting one in. You still need to carry the water back to your sink. We decided to add an island prep sink which is behind the stove area. This will allow us to fill pots even if someone is at the kitchen sink.  I am good with that.

I am really excited about how I was able to utilize a lot of what I considered dead space in my old kitchen. My kitchen did have a lot of bells and whistles but there were some things  I wanted to change. We have so many baking trays, cookie sheets, cutting boards, cooling racks etc. In my old kitchen, I did have a tray cabinet but it was not large enough for everything we had.

It is not a matter of getting rid of some of it because we cook and bake all the time and use it all. So we added more slotted storage to our kitchen. The cabinet above the refrigerator is one that we hardly used. It contained some light bulbs and a container of glue. We  added tray storage up there and I think it is going to be great.

We also have a bottom tray cabinet next to the stove as we did before and over the ovens we put more slotted storage. We have an oven drawer under the double ovens as we did before to handle frequently used pans and sheets.

Something else I am super excited about, are the great pull out cabinets we put on the other side of our cooktop. If you think our tray situation was excessive, our collection of spatulas, ladles, cooking spoons and other cooking tools rivals it. Currently, we had two large utensil drawers and 2 large crocks on the counter. I wanted to find a more useful and out-of-sight way to store what we needed.

Browsing Pinterest, I found these great pull out cabinets with crocks built-in. I showed them to my kitchen designer who incorporated them into the design. The insert is made by a company called Rev-a-Shelf, and they have so many creative ways to get the most out of your kitchen.

We have another pull out cabinet like that but with a different insert that can handle our cooking oils, sprays etc. In an upper cabinet to the right of the cooktop we have our spice cabinet.

Being tall, I hate having to stoop down to see all the way to the back of lower cabinets. In my current kitchen, there are only three cabinets I had to do that. The rest all had roll outs or were drawer units. In this kitchen we made sure that there are no cabinets that would cause me to lay on the floor or crawl into to see what is in the back.

I eliminated the desk area and glass door cabinet that was above it from my current kitchen. We did not use the desk and it was a catch-all for everything as were the glass door cabinets. In its place we added some more pull out pantry storage which I am crazy about.

The new refrigerator is being set into cabinets to give it a built-in look. On the side of my fridge in my other kitchen, I had decorative raised panels that matched the cabinets. In our new kitchen design we added some useful storage.  We are putting in a functioning cabinet that will have lower storage for our broom, dust pan etc and upper storage for cleaning supplies, garbage bags etc. Something similar to this design I saw on Pinterest.

In the new kitchen we have extended all our upper cabinets to 42″. This extra cabinet space will give us the room we need to store appliances that we don’t use every day. We are removing the extended sofits to make room for the taller cabinets. On top of the cabinets we will add a very nice crown molding.

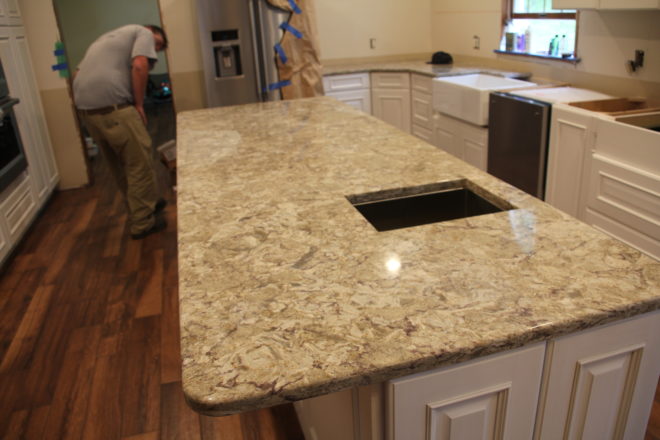
We are in the process of picking out our new quartz counters. In my old kitchen I had quartz counters and I love them. However, I want a little more movement in the new ones. I think I have found my countertop but not 100% sure.

Regina had me bring home my door sample and a large sample of the counter to look at it in the kitchen to make it easier for me to decide.

We are putting in a Farmhouse sink from Nantucket sinks and it has a really nice drain that we also chose from their website that never lets your hands touch the mess in the drain. Really cool and that is not all!

The sink has two front sides so you can choose what design you want. The smooth front of the Hyannis or the decorative side of the Chatham. I still have to pick the faucet. Oh, all the decisions!

We love the built-in butcher block we have in our old kitchen and so we went with one in this design also. It will be built into the side of the island to the right of the prep sink. We placed the pull out waste and recycling underneath so you can peel and chop and then just shove scraps right into the trash. To the side of the cutting board we put a large drawer to store our knives, and next to that, we put our utensil storage.


Another big change we are making is using two of the large island drawers to hold our dishes with a peg drawer inserts. This will make it easier to set the table and for the kids to get dishes themselves without having to climb up to reach them in upper cabinets. We added about 12 inches to the length of our island and this allowed us to put a 12 inch cabinet on the end with doors to store serving pieces, dishes and glasses.

Over the cooktop we have an English Country Elliptical Range Hood that matches the cabinets. I am not certain we are going with this style but I am leaning toward it.

The microwave will be hung over the counter next to the double ovens.

All of the cabinet doors and drawers are soft close and the doors are the full overlay style. We picked out our hardware too and I really like the way it looks and feels. The drawer pulls are nice and large and can accommodate hands of all sizes.

We have a large storage pantry in the same spot we did before but instead of having those wooden racks that pull and slide out to hold cans, we have added slide out shelf pull outs that our designer tells me I will find much more useful.

We are using commercial style appliances and I will update you on those in another post. For the flooring we are going to do a wood look porcelain tile. It is someone like the one I have but darker which I think will make the cabinets pop!

I think this is a long enough update for now. We have some exciting things to share regarding lighting with you soon. Let me know what you think of what we have picked out so far.


14 Comments

Filed under Cooking, Curb Appeal, DIY, Home, Home & Garden, Kitchen

Beautify Your Home With Porcelain Tile

Porcelain floor tiles are the hardest and most durable tile option available.  They are available in two types – through bodied and glazed.  Through bodied have the color and pattern throughout the tile whereas glazed tiles are covered with a hard finish, which makes them very strong and dense.  They are available in a wide selection of colors and sizes, making it very easy for you to customize patterns.  They resist water, stains, scratches, chips and even mold and mildew.  They are also relatively easy to keep clean.  Because of their versatility, porcelain floor tiles are a fantastic option for just about any room in your home.

tile kitchen 3


Bathroom

The bathroom sees not only a lot of foot traffic, but a lot of moisture as well.  People often spend a lot of time in this room.  Humidity often finds its way onto every bathroom surface.  Water from showers and baths is routinely splashed or dripped onto the floor.  Damp towels may be left lying around.  Porcelain is an excellent choice for flooring, walls and even counters.  It will resist all of the moisture in the air.  It will also make your bathroom a gorgeous place to be.  By choosing the right colors and smaller tiles, you can create a relaxing pattern on floors and walls.

tile bath

tile bath vanity

Kitchen

The kitchen is another room that sees a good amount of use.  The durability of porcelain floor tiles ensures that your floor will resist damage from foot traffic, but remain shiny and bright for many years.  Large tiles can make the kitchen appear more open.  Smaller porcelain tiles are also excellent for walls and floors.  You can create unique patterns on your wall to create a specific atmosphere.  Their durability makes them excellent for counters.


tile kitchen 5

SONY DSC

tile back splash

Entryway

Large floor tiles can create a very open and inviting entry to your home that is also resistant to most damage.  You can also use a variety of sizes to once again create a unique pattern.

tile floor

Porcelain floor tiles are extremely versatile.  You can use them on the floors, walls and counters of various rooms to unify the house.  And, with the overwhelming variety of colors and patterns available, you can create your own unique atmosphere that is both beautiful and long-lasting. For more information on porcelain floor tiles, head on over to PlumbTile.com and request your flooring samples today!


This is a sponsored guest post and the views expressed in this article do not necessarily reflect the views or opinions of Mommy Ramblings.

1 Comment

Filed under Home, Home & Garden, Home Improvement, Kitchen, sponsored guest post

Make Choosing Tile Easier With The Interior Design Tile Style Guide From Drury Design!!!

As someone in the middle of several home improvement projects with extensive tile work involved in 2 of them, I am excited to share a new guide to make choosing tile easier.  One of the most daunting parts of picking out tile is trying to find what you like, staying in your  budget and choosing tile that is right for the application you are using it for.  Walking in a tile showroom can be positively overwhelming!  There are so many patterns, colors, materials and finishes that it may cause your eyes to glaze over or make you have a panic attack.

Tile ModernBath

Last year at this time, I was picking out the tile for our master bath and I remember being so overwhelmed.   I just wanted to be in a room with 3 choices and make a simple decision.  Tile is something you don’t just change on a whim, you know it’s going to be with you for a long time and that’s why picking something that is going to go the long haul for you on style and  durability is paramount.

Tile Backsplash

If you wished an expert could be with you, holding your hand and guiding you, I may have the next best thing.  The Interior Design Tile Style Guide from Drury Design will help you understand everything you need to know when making a tile purchase. From the basics of whether  to choose glass, ceramic, porcelain, natural stone or exotic tile based on where it will be installed, durability, maintenance and your budget to lots of interior design ideas simple and ornate. Armed with the proper knowledge beforehand makes picking out tile a much easier and pleasurable task.

Tile Steamer_in_kitchen_drury

Tile Steamer_in_kitchen_drury

You can browse great design ideas for bathrooms, kitchens, backsplash trends and more for inspiration.  Check it out today and see what you think.  Let us know your thoughts.


1 Comment

Filed under Curb Appeal, DIY, Home Improvement, Main Page Post, Mommy Ramblings, Shopping

Master Bath Reno Update Featuring Concealed Cabinets!!! #CurbAppeal

concealed cabinet logo

Have you wondered what part of the master bath ren0 we are up to?   Did you think we were finished and going to do the big reveal?  I wish we were finished.  We have so many home improvement projects occurring simultaneously in our home right now, it feels like we are living in an episode of Hoarders.  What I mean by that is, since we had to empty rooms and closets, we are now storing so much in towers of boxes and bins it feels like our stuff is taking over.

Concealed Cabinet image

I cannot wait until the master bath is finished and it almost is but there have been such delays with the tile contractor and things have been done backwards.  He needs to finish the tiling of the stairs around the whirlpool and grout certain areas and then he still has to finish prepping the walls for paint which is going to get dust over everything again and should have been finished but let’s not even go there!

Anyway, you probably remember posts about the medicine cabinets and how we decided to go with Concealed Cabinets. If you missed that, you can read about it HERE and HERE.  We installed 2 of the extra-large concealed cabinets on either side of the vanity.  It was an easy install and they look great.  Concealed Cabinets  look like a picture frame and you can add whatever art work you like to the door front and change it whenever you want too!

For this review and update, I just put some scrapbook paper in the back of some prints I had.  I am changing them to something that fits the entire space and will be using photographs I took of our lake and gardens.  I tried two different papers with the prints but decided to use the print and changed the one that had the solid green-blue metallic paper. Until, the other prints come in, these will do and it’s just as well since we still have a lot of dust and construction to come.

this was a very stiff metallic paper and it looks very weird in the photo because of the way it reflected the light and it looks like two different colors.  That is not how it looks in real life but I did like the look of the print paper better so changed them.

This was a very stiff metallic paper and it looks very weird in the photo because of the way it reflected the light and it looks like two different colors. That is not how it looks in real life but I did like the look of the print paper better so changed them.


Concealed Cabinet 2

I have not put anything inside yet, since as you can see the walls still have to be finished.


This is the print background that I decided to put in the other as well until the enlarged photo prints come in.

This is the print background that I decided to put in the other as well until the enlarged photo prints come in.


Concealed-Cabinet 5

Concealed Cabinets are made of REAL WOOD, no plastic and come in different sizes and finishes.  We choose the white in the extra-large size. If you are looking for a change from the traditional look of ordinary medicine cabinets, a concealed cabinet could be just what you are looking for.  Right now they are having a SIZZLING SUMMER SALE and you can save 20% at www.concealedcabinet.com.  You can follow Concealed Cabinet on Facebook  and Twitter to see the latest news and updates on their product line.


Stay tuned for more updates and hopefully very soon the big reveal of the Master Bath!!!  I am keeping my fingers and toes crossed that it will not be much longer.

Innovators sponsored our project by providing us with the 2 Concealed Cabinets, as always, my views and words are 100% my own.

1 Comment

Filed under Curb Appeal, Discount Code, DIY, Home Improvement, Main Page Post, Mommy Ramblings

Master Bath Renovation Update in our Curb Appeal Series!!! #CurbAppeal

Well, it is time for another curb appeal update.  The master bath is slowly coming along. Our tile contractor still has about a week to finish but things are finally shaping up. Tomorrow they are grouting the shower and finishing more walls.  After all the walls are done they will tile the floor, then put the new toilet in, install the tub and we can get the shower panel and frameless doors on, the vanity installed, countertop and sinks, all the trim and the paint.

Here is a look at some of the progress since last time:

master bath


master bath 1


1 Comment

Filed under Curb Appeal, DIY, Home Improvement, Mommy Ramblings, Uncategorized

Master Bath Renovation Update-The Walls Are Going UP!!! #CurbAppeal

Very noisy and busy day in our household today.  The tile contractor finished the rest of the tile demo and started tiling the area that will be around the whirlpool tub.  Things are taking shape, of course we have a huge amount of work left but for the first time we are seeing the start of our new bathroom.

tile phase 2

These are 2 of the walls that will be around the tub.

tile phase 2 5

This picture shows the two walls in the picture above plus the third wall that is tiled to the ceiling since it is attached to the other floor to ceiling wall where the shower will be.
You can also see the niche that was tiled with the mosaic accents in the back of it.

A little better view of the niches by the whirlpool.

A little better view of the niches by the whirlpool.

With the walls demoed we were able to try the Concealed Cabinets for placement.  The cabinets are being installed in the walls on the side of the master vanity.  They will look a picture and hide a large medicine cabinet.  The walls will be tiled around the cabinets.  Above  each sink will be a large mirror and then we have new lighting that will be installed above the mirrors along with all the recessed lighting already installed.

Now that the walls are all demoed we are trying to figure the placement for the 2 Concealed Cabinets.

Now that the walls are all demoed we are trying to figure the placement for the 2 Concealed Cabinets.

Seem to fit how the studs are perfectly without any major changes.

Seem to fit how the studs are perfectly without any major changes.

I am sure there will be more updates tomorrow along with more noise but it is noise with a purpose.


Leave a Comment

Filed under Curb Appeal, DIY, Home Improvement, Main Page Post

Curb Appeal Updates: Master Bath Remodel, Let’s Talk About Tile, Tubs, Showers and Niches with a Side of Koi Pond!!!

Curb Appeal LogoWell, the master bath/master bedroom renovation project has officially commenced.  We already had the tile floor demoed and removed  back in the fall.  This week the tile contractor removed the old whirlpool tub, had to tear down the old platform and steps because there was a height and size difference with the new whirlpool.  He then ripped out the rest of the 5 foot high tiled walls in that section.  He is leaving us the shower, sinks and toilet still useable until the whirlpool section of the bathroom is finished. This week that area should be completed and he can start the rest of the demo and reconstruction/remodel.

New Platform Curb Appeal

Now, I thought about recycling the old whirlpool, since it worked and was in good condition but the color a bit dated. I know the components like the pump etc could be offered for a small fee or free via Craigslist or Freecycle, but what about the tub?  What could I do with that?  That is when I got a great idea.  I wondered if I could use it as a Koi pond.  I went downstairs and did some reasearch and indeed I could. It can be covered with a heavy-duty pond liner and set into the ground.  So that will be saved and we’re going to take you through that project as soon as the ground thaws.  Please tell me that as we brace for yet another snowfall that we will experience spring soon! Now lets talk about the tile, this is some of the tile we choose for the bathroom.  It was shipped straight from Italy and was delayed in customs, but finally arrived.  The pictures don’t do it justice.

Tile


tile 10

Tile 1

The colors are a gold/ivory color and the wall tile is a subway style, the floor has the same tile  but in 12″ by 12″ squares and then the gorgeous mosaics will be installed near the top in a 2 row width and finished with a row of the bullnose subway tile.

schluter logo


Niches, niches, who has the niches?  We do, and we have lots of them thanks to Schluter Systems and their prefabricated shower niches.  We will be using these in more than just the shower!  The largest niche is going in one of the walls surrounding the whirlpool.  It is a full tiled to the ceiling wall and will have the 12″ by 28″ niche installed with the subway bullnose tile and the mosaics in the back that will make it pop off the wall.  It also has a floating shelf that will be set midway and tiled.

Schluter Shower Niche


Schluter Shower Niches


Schluter Shower Niches


Installed Schluter Shower Niche


Floating Shelf Schluter Shower Niche

I thought it would be a great accent as well as useful storage that was handy for bath products. A shower niche is an ideal spot to keep shampoos and soaps in a tiled shower. Building a fully waterproof, properly sealed tiled shower niche can be a detailed and time-consuming task. Schluter-Systems has developed four prefabricated and completely waterproof shower niches that are ready to tile. Made of Schluter®-KERDI-BOARD, the shower niches are completely compatible with surface applied waterproofing systems, such as the Schluter®-KERDI and KERDI-BOARD shower assemblies. All four shower niches feature a 1/2″ (12.5 mm)-thick by 2″ (50 mm)-wide integrated bonding flange that sits perfectly flush with the surrounding wall area. The larger sizes include an optional prefabricated shelf that can be installed at any height to create separate compartments within the shower niche.

The preformed shower niche provides installers with increased speed during installation, combined with complete waterproofing dependability. The corners of a traditional shower niche are the most challenging area to waterproof and can be very susceptible to standing water and mold growth. With pre-sealed niche corners this challenge is completely eliminated. The niche complements an already wide array of preformed shower components available from Schluter-Systems, including shower trays, curbs, ramps, and benches. All of these components help installers build waterproof and vapor tight tiled showers more quickly and effectively than with traditional construction materials.

The shower niche is available in four different sizes and we have all of them so we will show you how they not only function so well in the shower but we will install them in areas you might not think for some great design option.  For instance the install in the tile wall by the whirlpool and we also plan to install two in the tiled wall above the new vanity to hold soap and other frequently used products neatly off the countertop.  We will of course be also using one of the larger sizes in the shower as well as one or two of the smaller sizes.  We will take you through the progress of the installation of these great products.  To see more about the niches or anf the other great products from Schluter, just visit their website and be sure to follow them on FacebookTwitter and YouTube.


Leave a Comment

Filed under Curb Appeal, DIY, Main Page Post