Tag Archives: Home Tips

10 Simple Ways to Organize Your Kitchen

If your kitchen is like mine, it is Grand Central Station for your home. I know when my kitchen is organized, it is easier to find what I need, and to work more efficiently. Here are 10 simple ways to organize your kitchen.

Purge Your Cabinets

Take everything out of your cabinets and drawer. Think carefully, do you really need it all?  I am almost sure you will find, there are many things you need to get rid of or donate. Put back only what you need. Place the items that you want to donate in a box and put the box by your door. On your next trip out to your vehicle,  carry the box to your car, so it is ready to be dropped off.

Group Similar Items

With your cabinets empty, start to really think about the best way to group items in them. Look at the things you are keeping and arrange baking things together, serving pieces together and so on.

Think About Your Space

Next, think about the best cabinet or drawers to put those things. Drinking glasses are probably best by the sink and dishwasher. Remember, you want things to run as smooth as possible, so have your coffee maker near your mugs and your pot holders near your oven. Be mindful of this as you decide where everything you are keeping goes.

Use Clear Plastic Bins

Use clear bins and containers to organize things inside your cabinets. Small bins are perfect for containing hot cocoa packets, oatmeal packets and more. Food in tiny boxes like pudding, can be stored in clear containers, so  it does not get lost among larger items.

Another food or pantry storage idea, is to use clear mason jars. You can even vacuum seal them if you have a Food Saver with a jar device.


Go Through Your Food Storage Containers

Go through your food storage containers and get rid of anything you don’t have a lid for. Organize what you have left by placing the lids in a clear plastic bin, so they can be stored  vertically. If all you have is just a bunch of tired Chinese food containers with no lids, think about throwing it all out and starting with a set of quality food storage containers.

Utilize Space Effectively,

That cabinet above your refrigerator, microwave or oven can be fitted with vertical rack dividers that allow you to store cookie sheets, trays, platters and more. In my new kitchen, I chose to have these dividers built in. I can tell you, it is much easier to store cutting boards, baking pans, large platters, trays etc. I did this to the cabinet above my oven and the one over my refrigerator.

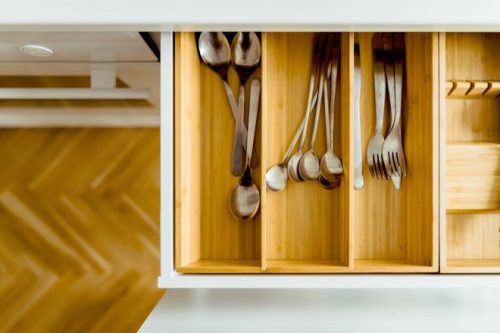
Organize Your Drawers

Pick up some bamboo drawer dividers to organize your utensils and cutlery. You can find ones that expand to fit a variety of drawer sizes.  Smaller plastic bins can help you contain pens, pencils, tape scissors etc. Allow yourself only one junk drawer if possible.

Tackle Your Refrigerator

Clean out your refrigerator. Wipe down all the surfaces inside and out. Go through all your food and condiments, and get rid of anything that is old, expired, or you don’t use. Grab some plastic bins and use them to organize your food especially smaller items like juice boxes, food pouches and smaller condiments.

Another idea that can save you time is to organize items that you use to pack lunches for yourself or your kids. That way you can quickly grab things like yogurt, cheese sticks, juice boxes, fruit etc.

Finally, if you like to keep a lot of cold drinks on hand for yourself or the kids, you may want to consider getting a dedicated refrigerator for these items. The best beverage refrigerator by Danby can hold up to 120 cans and is quite compact so it won’t take up much space in your kitchen.

Get Under the Sink

Maximize your space under the sink with a 2 Tier Expandable Adjustable Under Sink Storage Shelves. This will maximize your space to store your cleaning products, soaps, sponges and more.


Hang It Up

Organize your mop, broom, dustpan and more with a hanging storage rack that you can mount to the inside of a closet or pantry door.

It is easy to organize your kitchen when you have the right tools. Weeding out the excess and organizing what you have will maximum your kitchen’s efficiency. With a streamlined and more organized kitchen you might find you like cooking and entertaining even more.


9 Comments

Filed under Home, Home & Garden

Getting Final Remodeling Projects In Before Winter Comes

Autumn Is Here!

What’s that you smell in the air, is it a pumpkin-spiced latte? What’s that you feel in your soul as you drop your kids off at school—is it, could it be…pure joy? Well, not pure. You’ll miss them, of course—but what a relief! From eight to three (or 2:30 if you’re not so lucky), your kids are taken care of, they learn, and you get time to do what you need to.

One of those things could be some post-summer remodeling. Autumn and winter can be ideal times to upgrade your home, especially if you live in the south.  It’s not as hot outside, making yard work especially appealing.

Additionally, it’s a traditional “off-season”, so you may find decreased rates available. With school in session,  the kids won’t be tearing around the yard, getting in the way of contractors.

If you don’t live in the south, autumn still is an ideal time to remodel because winter is coming, and as they’re fond of saying in the adults-only HBO show Game of Thrones, “Winter is coming!”. It’ll get cold soon, and if you don’t take care of things like roof repairs, you could end up with much bigger structural problems. 

Some Outdoor Work

You want to get your roofing done before the winter hits. Since it’s already autumn, if you have not started, you might want to check out sites like South Jersey Roofers since they offer high-quality workmanship, a commitment to customer satisfaction, and proven reliability.

If you wait too long and live in a northern state, you may not be able to find any roofers to repair your issues. If that happens, you might have to use an emergency solution to get by until the weather warms up.  

Fall is a great time for last-minute structural remodeling. Additionally, you may not appreciate the features of some remodeling projects until late spring. Pergolas are one of those projects that come to mind.

If you’ve never heard of a pergola, this term refers to an adjustable awning which can be positioned with the touch of a button. It can keep out the snow, wind, and rain, or it can let in the sunshine. Whatever your preference, with the press of a button, you can change the way you enjoy your deck.

When it comes to outdoor pergola builders, you’ll be able to find top-tier solutions that will fit your needs; whether it be opening it up with the touch of a remote, angling it to provide the right amount of shade, or closing it completely.

Additional Considerations

You can actually use a pergola during winter as well.  Even in the coldest climates, there will be mild days, and you may want to read a book on the back deck in the sun. Soak up that winter sun while you can, if the clouds come in and you can feel the snow, just close the pergola slats, grab a blanket and keep reading.

Fall can also be the perfect time to install a security system. Again, it’s not nearly so hot outside as during the summer, and you want to have that system in place by the winter. There seems to be an increase in crime during the winter in southern states. This may not be the case if you live in the north, it will depend on your region. 

All in all, fall is the opportune time to tackle home improvement projects and make property upgrades like additions and completing essential home maintenance to prepare for the coming winter.

This is a sponsored post that does not necessary express the views or ideals of Mommy Ramblings.


Leave a Comment

Filed under Guest Post, Home & Garden, Home Improvement

3 Ways to Spot a Damaged Roof

This time of year can throw all kinds of weather at us; rain, wind, hailstones and more. So, whether you want to keep your home as safe as possible or your viewing new properties in the hopes of moving, it’s important to know how to spot damage. One of the most overlooked places on a house is the roof. Yet, if the roof has damage it can cause all kinds of problems inside the house. So, what do you need to look out for?

Check Your Shingles

One of the easiest tips, recommended by Elevated Roofing, is to check the roof for ripped shingles. After a storm, a few ripped shingles are often the easiest things to spot, just by looking at your roof from the ground floor. They may not look like they’ll cause a lot of hassle is left as they are, but it’s important to get them repaired as soon as possible, especially during the wetter months. One of the biggest problems to result from loose or damaged shingles is a leak in the house. You may not even notice it until it’s too late.

Hailstone Dents

It can be difficult to spot hailstone dents, but if you’ve recently had a bout of hailstones that you think could have caused damage, it’s worth checking. If you can spot dents on the roof, take a look at the angles of the roof, where the roof meets the wall. You’ll often be able to see dents in guttering too. If they’re present there, they’re likely to be present on the roof. If your roof slants, don’t attempt to climb it and check it yourself. Call a trustworthy professional who can give you a quote for any damage at the same time.

Inspect Your Attic

If you can’t see any visible damage by looking at your roof from the outside, it’s a good idea to get up into your attic and check for any leaks. If you spot a leak, it will easier to pinpoint where on the roof the damage is coming from and it’s often easier to contain and resolve the damp once found in the attic. If you don’t check or ignore the leaks found in the attic, it’s inevitable the leak will eventually spread throughout the rest of the house. Leaks will often present themselves as stains on the wall, rather than actual water puddles.

If you do find a leak in the attic but you have trouble pinpointing it, here’s a quick tip: Ask someone to help you and take a garden hose up onto the roof. Isolate small areas near to where the attic leak is. Let the hose run for several minutes in each area and have your helper in the attic looking out for leak. After a few minutes, the drip should appear in the attic. It can be time-consuming, but it will help you to narrow down where the damage is and find out how it needs to be fixed.

This is a sponsored guest post and does not necessarily represent the views of Mommy Ramblings.

1 Comment

Filed under Home & Garden, sponsored guest post